【Unity入門】InputFieldに入力された文字列をテキストに反映させよう!

こんにちは、もぎです。
Unityでゲームを作っていると名前の入力やチャット機能などユーザーに文字列を入力してもらって、その値を使いたい場面が出てきますよね。
Unityでは、文字列の入力機能はInputFieldというオブジェクトを使います。
この記事ではInputFieldに入力された文字列をテキストに表示させるサンプルを用いてInputFieldの使い方を解説していきます。
また、日本語入力やInputFieldの入力を受け付けなくするなど覚えておくと便利な機能も扱っていきます。
この記事の目次
今回できるようになること
InputFieldに文字列を入力して、入力された文字列をテキストに表示させます。
準備
オブジェクトを作成
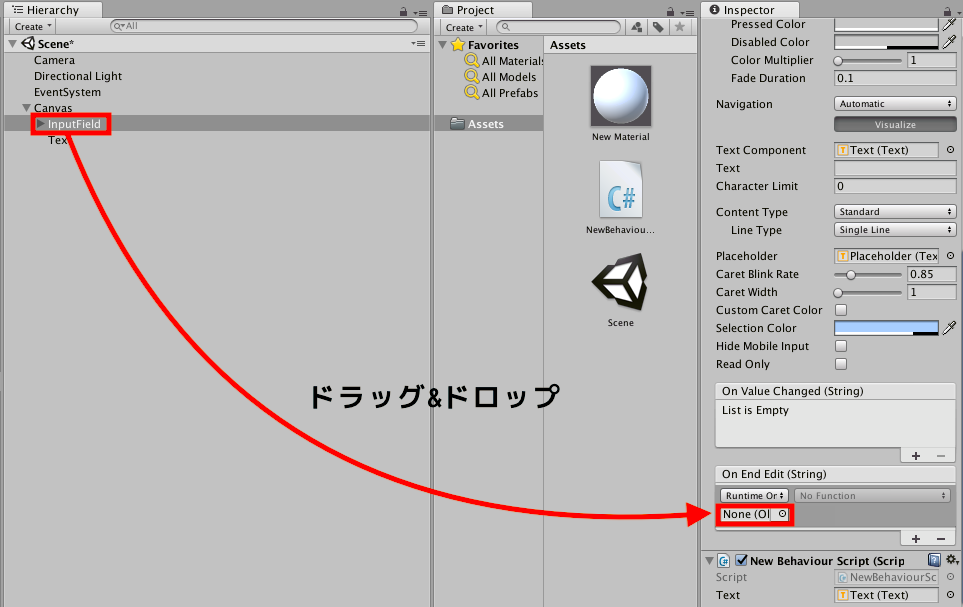
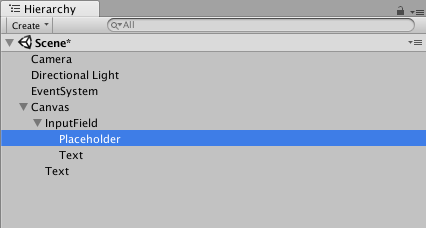
まずは、Canvasを作ってその子階層にUIのInputFieldとTextを配置してください。
InputFieldはCreate>UI>Input Fieldで作ります。
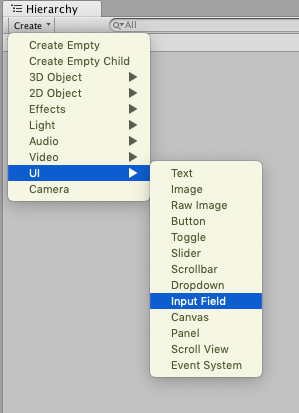
Hierarchyビューは下記の画像のようになります。

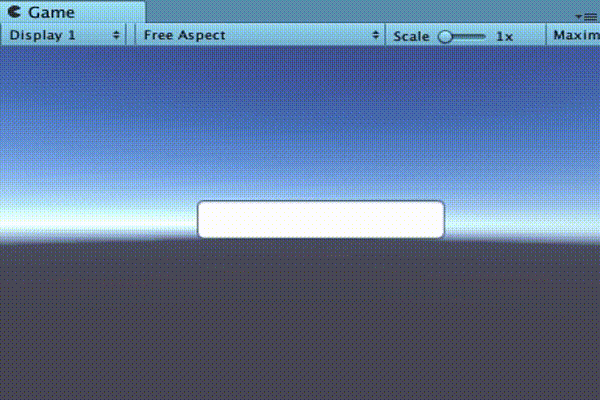
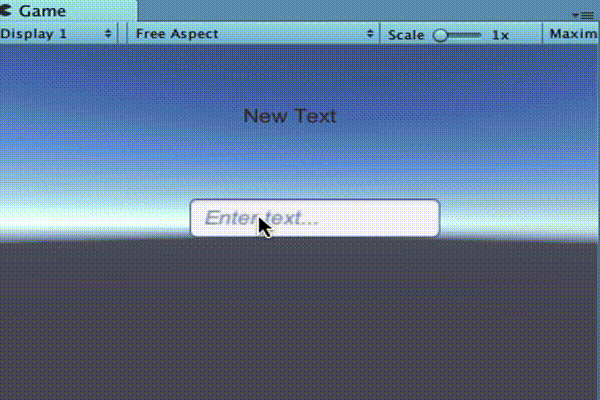
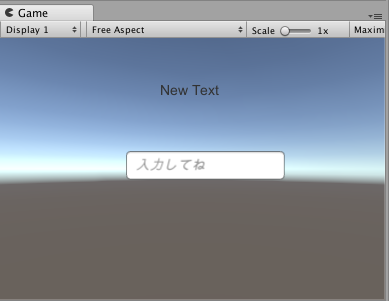
Gameビューはこのような見た目にしておきましょう。

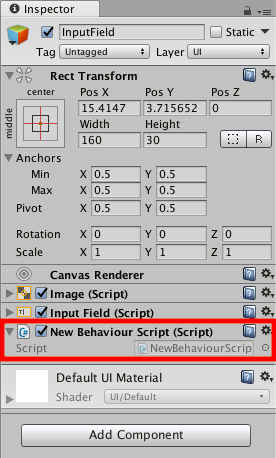
スクリプトを作成
スクリプトを作成してInputFieldにつけておきましょう。
これで準備ができたので、InputFieldに入力された文字列をテキストに表示してきましょう。
InputFieldに入力された文字列をテキストに表示
InputFieldに入力された文字列をテキストに表示していきます。
スクリプトに記述していきましょう。
スクリプトの記述内容
using System.Collections;
using System.Collections.Generic;
using UnityEngine;

// InputFieldを使えるようにする
using UnityEngine.UI;

public class NewBehaviourScript : MonoBehaviour {

    // inputfieldを格納する変数
    InputField inputField;

    // テキストを格納する変数
    public Text text;


	// Use this for initialization
	void Start () {

        // InputFieldコンポーネントを格納
        inputField = GetComponent<InputField>();

    }

	// Update is called once per frame
	void Update () {

	}

    // InputFieldに入力された内容をテキストに表示
    public void DisplayText()
    {
        // テキストに入力内容を表示
        text.GetComponent<Text>().text = inputField.text;
    }


}
簡単に説明すると、スクリプトの上の方にusing UnityEngine.UI;を記述することでスクリプト内でInputFieldやTextを使えるようにします。
このスクリプトのポイントは、DisplayText()というInputFieldに入力された内容をテキストに表示する関数ですね。
DisplayText()はInputFieldの『On Value Change』か、

『End Edit』にセットして使います。

『On Value Change』にセットしたらInputFieldの内容が変更された時にDisplayText()が呼び出され、
『End Edit』にセットしたらInputField外をクリックしたり、エンターボタンを押すなどInputFieldからフォーカスが外れた時にDisplayText()が呼び出されます。
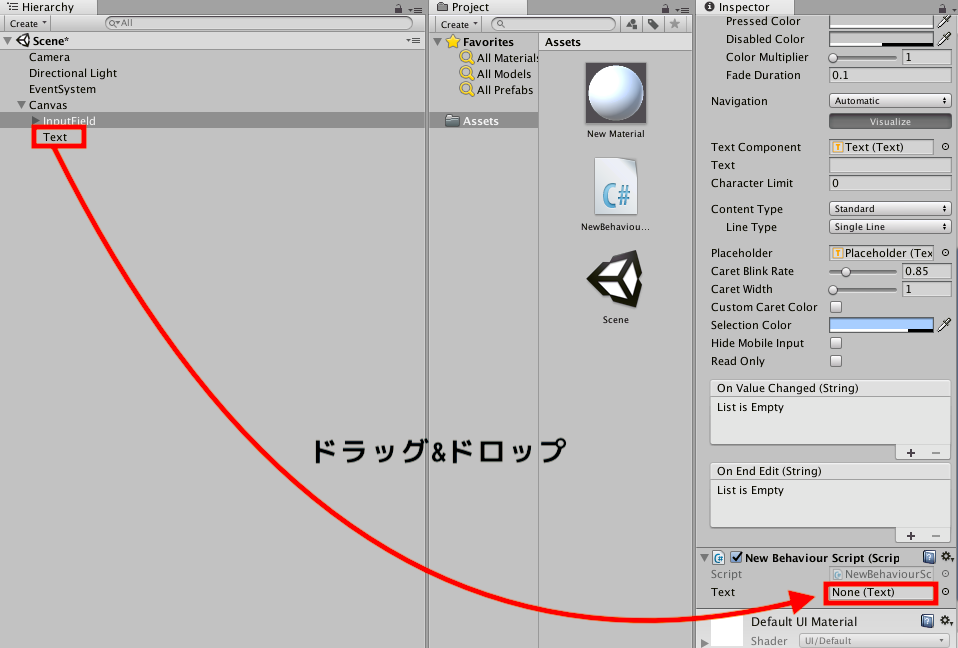
スクリプトにテキストオブジェクトをセットする
スクリプトではpublic Text text;という記述をしたので、テキストオブジェクトをスクリプトにセットしましょう。
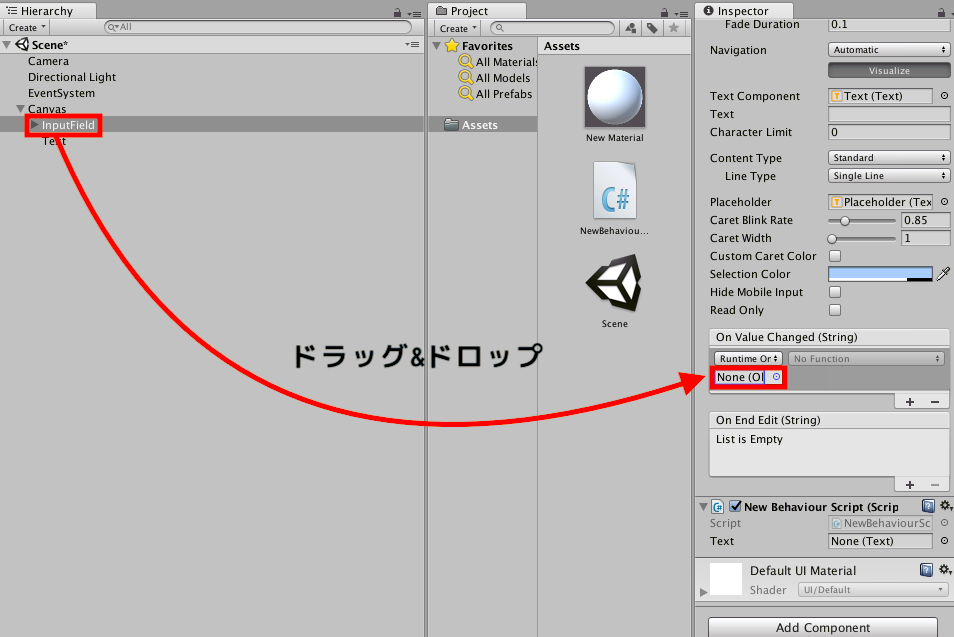
InputFieldオブジェクトを選択した状態で、スクリプトのText変数にTextオブジェクトをドラッグ&ドロップしてください。
InputFieldに関数をセットする
InputFieldに関数をセットしていきます。
『On Value Change』(内容が変更された時)と『End Edit』(フォーカスが外れた時)の二種類あるのでそれぞれにセットしてみて挙動を確かめてみましょう。
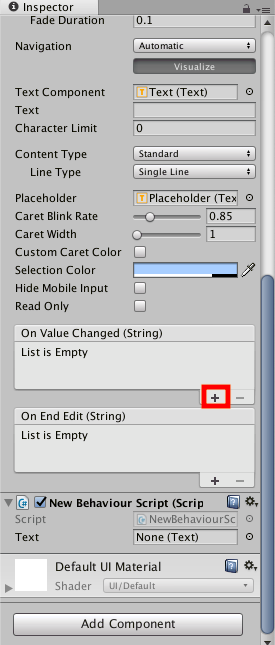
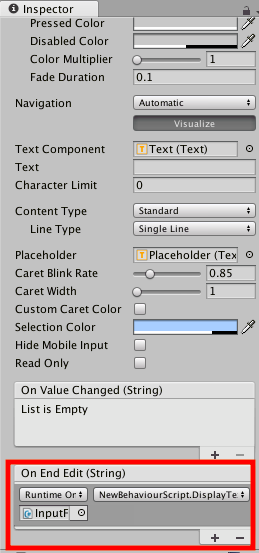
On Value Change(内容が変更された時)
『On Value Changeに関数をセットしていきましょう。
まずは『On Value Change』のプラスボタンを押します。
そのあとにInputFieldオブジェクトをドラッグ&ドロップしましょう。
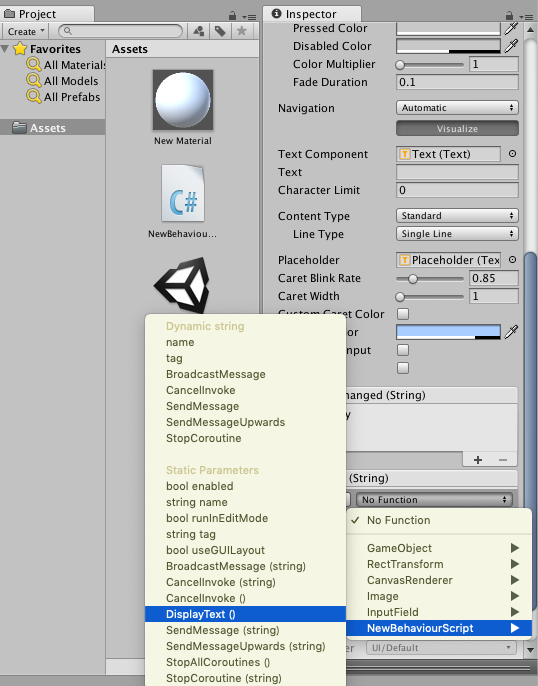
そのあとに作った関数をセットします。
No Function >スクリプト名(今回はNewBehaviourScript) >関数名(今回はDisplay Text()) を押してください。
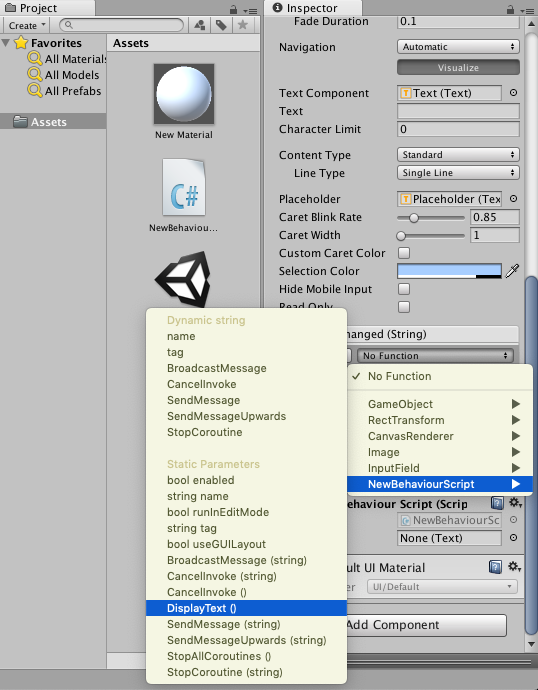
これで関数がセットできました。
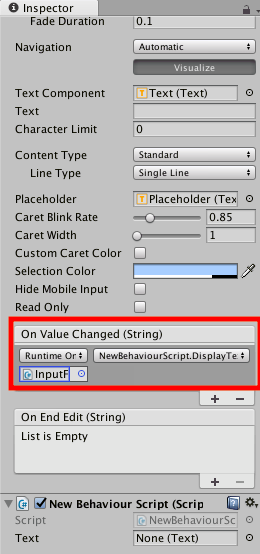
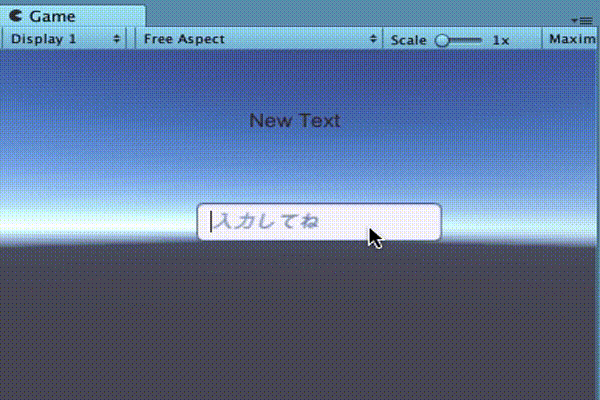
実行してInput Fieldに文字を打ち込んでみましょう。
文字が打ち込まれると同時にテキストの表示内容が変わっていますね!
End Edit(フォーカスが外れた時)
次はEnd Editに関数をセットしていきましょう。
『On Value Change』に関数がセットされている場合は取り除いてください。
マイナスボタンを押すことで取り除くことができます。
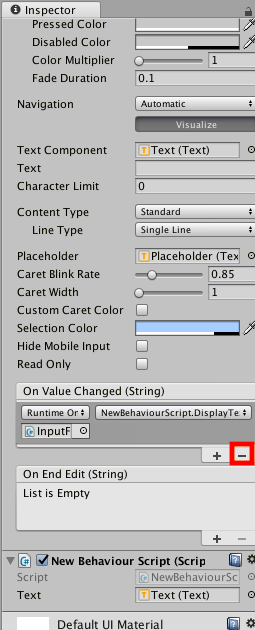
それではEnd Editに関数をセットしていきましょう。
まずは『End Edit』のプラスボタンを押します。

そのあとにInputFieldオブジェクトをドラッグ&ドロップしましょう。
そのあとに作った関数をセットします。
No Function >スクリプト名(今回はNewBehaviourScript) >関数名(今回はDisplay Text()) を押してください。
これで関数がセットできました。
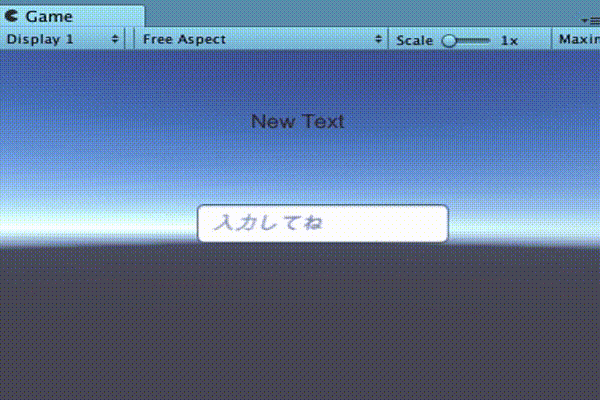
実行してInput Fieldに文字を打ち込んでみましょう。
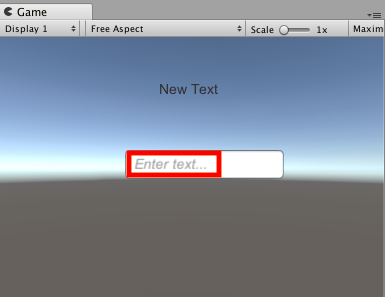
InputFieldの外をクリックして、フォーカスが外れた時にテキストに入力内容が表示されていますね!
Placeholderの文字を変える
次はPlaceholderといってInputFieldの後ろにうっすらと見える文字がありますよね。
次はこの文字を変えていきましょう。
InputFieldの子階層にあるPlaceholderを選択した状態で、
InspectorからTextコンポーネントのTextに記述されている文字を変更してください。
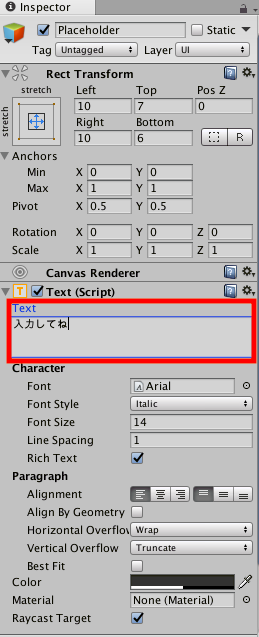
これでPlaceholderに表示されている文字を変更できます。
日本語を入力できるようにする
InputFieldは最初の段階では日本語を入力することができません。
日本語を入力できるように設定していきましょう。
やることはInputFieldを選択した状態で、inspectorからLine Typeを『MultiLineNewline』に変更するだけです。
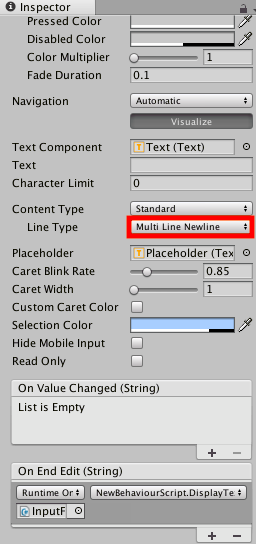
これで日本語が入力できるようになりました。
スクリプトでInputFieldにフォーカスする
今まではInputFieldをクリックすることでフォーカス(文字を入力できる状態にすること)していましたが、スクリプトでフォーカスすることもできます。
フォーカスしたい箇所で、
inputField.ActivateInputField();
と記述することでできます。
今回はスタートと同時にフォーカスするようにしましょう。
記述内容は、
using System.Collections;
using System.Collections.Generic;
using UnityEngine;

// InputFieldを使えるようにする
using UnityEngine.UI;

public class NewBehaviourScript : MonoBehaviour {

    // inputfieldを格納する変数
    InputField inputField;

    // テキストを格納する変数
    public Text text;


	// Use this for initialization
	void Start () {

        // InputFieldコンポーネントを格納
        inputField = GetComponent<InputField>();

        //InputFieldにフォーカスする
        inputField.ActivateInputField();

    }

	// Update is called once per frame
	void Update () {

	}

    // InputFieldに入力された内容をテキストに表示
    public void DisplayText()
    {
        // テキストに入力内容を表示
        text.GetComponent<Text>().text = inputField.text;
    }


}
実行結果は、
少しわかりにくいですが、スタート時にフォーカスされていますね!
Input Fieldに入力できないようにする
スクリプトからInput Fieldの入力を受け付けなくすることができます。
記述内容は、
inputField.interactable = false;
今回はInput Fieldが入力されたら、次の入力ができないようにしましょう。
記述内容は、
using System.Collections;
using System.Collections.Generic;
using UnityEngine;

// InputFieldを使えるようにする
using UnityEngine.UI;

public class NewBehaviourScript : MonoBehaviour {

    // inputfieldを格納する変数
    InputField inputField;

    // テキストを格納する変数
    public Text text;


	// Use this for initialization
	void Start () {

        // InputFieldコンポーネントを格納
        inputField = GetComponent<InputField>();

        // InputFieldにフォーカスする
        inputField.ActivateInputField();

    }

	// Update is called once per frame
	void Update () {

	}

    // InputFieldに入力された内容をテキストに表示
    public void DisplayText()
    {
        // テキストに入力内容を表示
        text.GetComponent<Text>().text = inputField.text;

        // 入力できないようにする
        inputField.interactable = false;
    }
}
実行結果は、

一度入力したら入力できなくなっていますね!
まとめ
今回はInput Fieldを扱ってきました。
いくつかInput Fieldのいくつかの機能も扱ってきましたが、他にも様々な機能があるので色々いじってみてください!